
In New Zealand, the packing group (PG) system classifies dangerous goods by the degree of danger they present during transport. It is part of both the Land Transport Rule: Dangerous Goods 2005 and the UN Recommendations on the Transport of Dangerous Goods, which New Zealand follows.
You must understand this as part of your D endorsement course.
Here’s how each group works:
Purpose of Packing Groups
Packing groups determine:
- The type and strength of packaging required for safe transport.
- The degree of hazard posed by a substance within its class (e.g., flammable, corrosive, toxic).
- How the goods must be labelled and documented.
Not all dangerous goods have packing groups. For example, Class 1 (explosives), Class 2 (gases), Division 5.2 (organic peroxides), Division 6.2 (infectious substances) and Class 7 (radioactive materials) are categorised differently.
Packing groups can be determined by a substance’s flash point. The flash point is the lowest temperature at which a liquid gives off enough vapour to ignite when exposed to an ignition source such as a spark or flame.
It’s a key measure of how flammable or combustible a liquid is, and it’s used to determine the packing group and dangerous goods class for transport. For example, class 9 UN3082 diesel is PG II unless it has a flash point over 60 degrees Celsius, in which case it is PG III.
Packing Group I – High Danger
- Definition: Substances presenting high danger during transport.
- Example materials: Highly toxic poisons, strong acids like nitric acid (>65%), or highly flammable liquids with very low flash points.
- Packaging requirement: Strongest type — UN Performance Level “X” packaging.
- Typical label: Class diamond (e.g., Toxic, Flammable) with full UN number and proper shipping name.
- Implication: Only the most robust packaging systems are allowed; they often require special handling and segregation.
Packing Group II – Medium Danger
- Definition: Substances presenting medium danger.
- Example materials: Moderate flammability liquids (e.g., petrol), acids like hydrochloric acid, and less toxic chemicals.
- Packaging requirement: UN Performance Level “Y” packaging.
- Implication: Packaging must meet strength tests suitable for moderately hazardous goods.
Packing Group III – Low Danger
- Definition: Substances presenting low danger.
- Example materials: Diesel, diluted acids or alkalis, paints with higher flash points.
- Packaging requirement: UN Performance Level “Z” packaging — the least stringent but still tested and certified.
- Implication: Used for goods that are still dangerous but relatively less likely to cause severe harm if spilled or leaked.
Example Application
For example, flammable liquids (Class 3) are divided by flash point and boiling point:
- PG I: Flash point < –18 °C and boiling point < 35 °C
- PG II: Flash point < 23 °C and boiling point > 35 °C
- PG III: Flash point ≥ 23 °C and ≤ 60 °C
In Practice (NZ Transport Context)
When transporting dangerous goods in NZ:
- The packing group is listed on the Dangerous Goods Declaration (DGD) and transport document.
- Packaging must be UN-approved and marked with the appropriate X, Y, or Z code.
- Carriers and drivers must be trained in the Land Transport Rule: Dangerous Goods 2005 and ensure segregation and placarding comply with the requirements.
How to determine how much you can carry
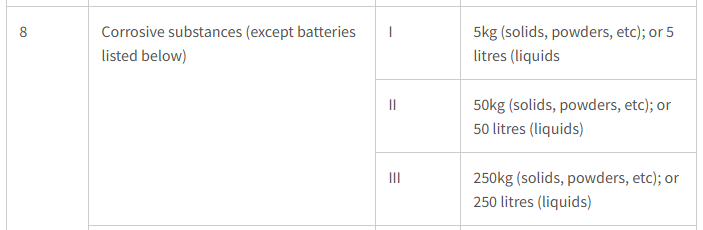
If you check in Schedule 1 in the Dangerous Goods study guide (or from NZTA’s website), you’ll see that some maximum quantities change depending on the packing group when you are carrying goods are tools of trade or not for hire or direct reward.
For example, for tools of trade:
Class 8, PG I – you can carry 5kg or 5 litres
Class 8, PG II – you can carry 50kg or 50 litres
Class 8, PG III – you can carry 250kg or 250 litres.
You can see this in the table in Schedule 1.
If you are carrying goods as DGLQs (dangerous goods in limited quantities) or consumer commodities, check in Schedule 2.
For commercial transport, check in Schedule 3. The packing group tends to affect the segregation requirements, and also defines the inner packaging weight or quantity (e.g. packages of 1 litre). For example, many goods can be transported in the same vehicle using a segregation device or three metres separation if they are PG II or PG III, but must be in a separate vehicle if they are PG I.
For excepted quantities, check Schedule 4. This will give you the packing group, the maximum quantity per inner packaging and the maximum quantity per outer packaging. For example, 30 litres inner packaging and 300 litres outer packaging.


Darren has written over 3000 articles about driving and vehicles, plus almost 500 vehicle reviews and numerous driving courses. Connect with him on LinkedIn by clicking the name above