
A Roadranger gearbox is a non-synchonised or ‘crash’ gearbox found on larger American and Asian trucks (although more and more of these trucks are coming with automated manual transmissions or AMT). The most common configuration is 18-speed, but you will find them with 13 and 9 gears.
Don’t expect to be able to get into a truck with a Roadranger gearbox and drive it immediately. We recommend doing our Roadranger training course if you are going to be driving a Roadranger gearbox so that you can learn about range changes, split shifts, progressive shifting, block or skip shifting and more.
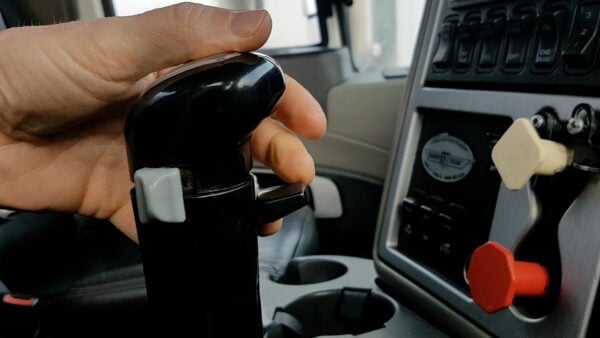
While the gearstick has the same 6 positions as many car gearboxes, there are two additional switches and a completely different technique required.
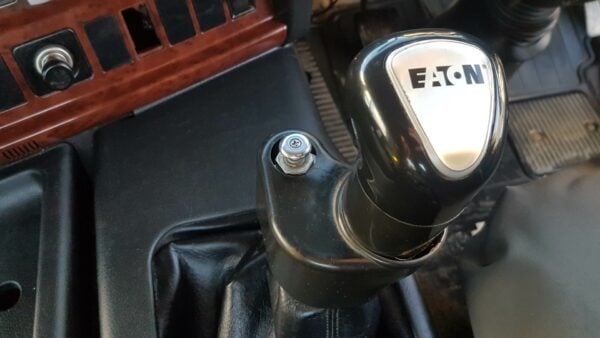
The gearbox has its gear positions in a different place to a 6-speed car gearbox, too. In vehicles equipped with this type of gearbox, there will be a shift pattern diagram either on the top of the gear lever, or on a label in the cab (often on the sun visor or dashboard).
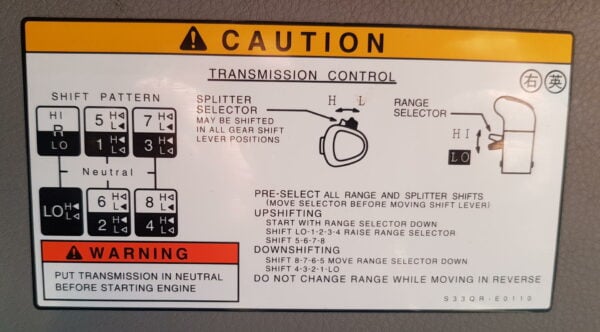
We’ll come back to the gear position once we know how to get it into a gear.
Getting a Roadranger into a gear when stationary
The gearbox has a mechanism to brake the clutch or countershaft to help get the truck into gear when stationary. This is because the front gears are moving as long as the engine is moving, but the back gears are stationary, leading to graunching noises if you try to push it into gear.
So, we need to slow the front box down. This is done by using a clutch brake or countershaft brake. Depending on your truck, this will either mean pushing the clutch the whole way to the floor, or it will mean pushing a button on the side of the gearstick.
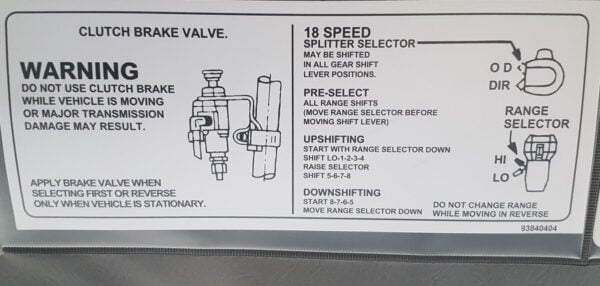
It’s important you don’t use the clutch brake or countershaft brake while you are moving, only when you are stationary, otherwise you could cause damage. You use this in your starting gears (either Lo, 1, 2, 3 or 4, or any of the reverse gears).
The gear you choose should be a gear whereby you can release the clutch slowly and the truck begins to move with little or no throttle input – you certainly should not be needing to feather or slip the clutch to get moving as this will wear the clutch out very quickly.
Changing gear
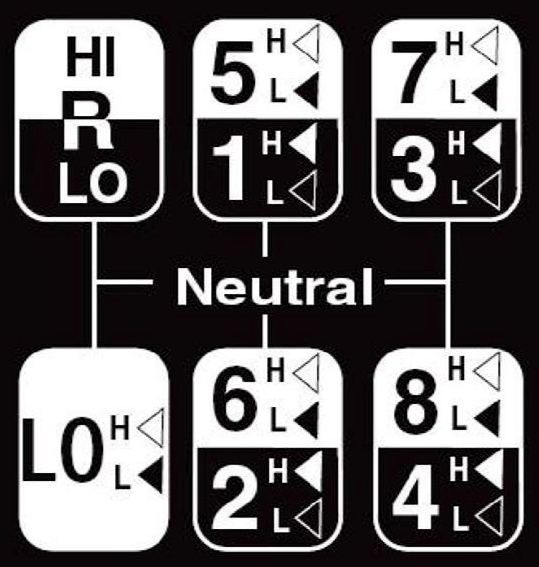
The Roadranger gearbox doesn’t change gears like a manual gearbox in a car. A car’s gearbox is a synchro ‘box – you push the clutch in, change the gear then let the clutch out. A Roadranger requires two pushes of the clutch: the first is to take the gearbox out of gear and into neutral and the second is to put it into gear. To get the next gear, the revs need to match the road speed, and that is the main skill required to use a Roadranger gearbox.
Some drivers do this without using the clutch (called ‘floating the gears’) but this is not recommended by Eaton.
Changing up using a lever change
You’ll use a process called double-clutching or double-declutching. This is the easiest gear shift and the sequence is:
- Push clutch as you release the accelerator
- Pull the gear lever into neutral and release the clutch
- Push the clutch as the revs are dropping and snick it into the next gear
- Release the clutch and press the accelerator.
We abbreviate this as clutch to neutral, clutch to gear. In the space between pushing the clutch in and putting the gearstick into neutral, the revs will drop enough for you to choose the next gear.
Changing up using the splitter
Changing from L to H is easy. You simply move the grey button forwards, lift your foot off the accelerator and push the clutch quickly, and it should change gear.
If you have an old or worn gearbox, it may not be possible to do a split change without following the lever change process, putting it into neutral and then back into the same gear.
Changing down using a lever change
This is harder to master as you need to introduce some extra revs to match the road speed. The sequence is:
- Push clutch as you release the accelerator
- Pull the gear lever into neutral and release the clutch
- Blip the throttle to give the engine more revs (around 400 per whole gear change, but this will vary per gearbox)
- Push the clutch and snick it into the next gear
- Release the clutch as you press the accelerator.
It’s easy to mess this up when you first start. Don’t force the gearbox into position or you can strip the teeth off the cogs and that means an expensive gearbox rebuild. Worst case scenario, you have to stop the truck and start again.
Changing down using the splitter
Changing from H to L is similar to changing up, except it’s helpful to introduce a few extra revs to the engine by blipping the throttle to help it change.
Changing range
To get between 1-4 and 5-8, you need to change the range. This is done using the switch on the front of the gearstick. Range changes only happen when you move the gear lever into neutral, therefore you pre-select the range switch before you change gear and it will change as soon as you pass through neutral.
Changing both the range and splitter
If you want to go from 4H to 5L, you need to change both the range and splitter. First, pre-select the range from lo range to hi range, then move the splitter button back just before you change gear following the double-clutching process. Remember that the split will want to change as soon as you break torque by lifting the accelerator and pushing the clutch.
Compound shifts
For example, you can change from 5L to 6H by pushing the split button forwards and then moving the gearstick from 5 to 6 using the double-clutching process. You can also change from 6H to 8L, which is a compound shift, too.
Skip shifts
When you skip a whole gear, it’s called a skip shift. For example from 8L to 6L.
Will you use all the gears?
Unless you are pulling very heavy loads, you’re unlikely to use LO gear or first gear in an 18-speed Roadranger. With medium loads, the starting gear will often be 2 or 3. With a light load the starting gear will often be 3 and with no load you should be able to start in 4th.
The idea is to get through the first range (1-4) as quickly as possible and into high range. This improves fuel economy. The majority of your driving (unless you’re doing logging or mining work, or transporting oversized or overweight loads) will be in gears 3, 5, 7 and 8 if you are using skip shifts.


Darren has written over 3000 articles about driving and vehicles, plus almost 500 vehicle reviews and numerous driving courses. Connect with him on LinkedIn by clicking the name above
 Disqus