
• A TR Group Site
  • Help
  • Cart
Driving Tests DT logo small
Driving tests
  • Learner licence
    • Car
    • Motorbike
    • Heavy vehicle
    • Learner Licence Plus
  • Courses
  • Tourist
  • Resources
  • Learn
  • Resources
  • Learner licence
    • Car
    • Motorbike
    • Heavy Vehicle
    • Learner Licence Plus
  • Your courses
    • Enrolled courses
  • View all courses
  • Tourist
  • Resources home
  • iOS application
  • Android application
  • Contact us
  • Terms and conditions
  • Privacy
  • Home
  • /
  • Resources
  • / 23: Higher-speed areas – driving a curve

23: Higher-speed areas – driving a curve

— No Comments ↓

The aim of this lesson is for you to legally and safely drive at higher-speeds through a left or right bend in the road (a curve) while maintaining a safe position and speed. You’ll need to be driving in a 70-100kph zone on a two-way road with a left or right curve that requires you to slow down.

Note that many cars will safely negotiate many curves at the speed limit, particularly if you are in a 70kph zone. Look for curves that have a posted advisory comfortable speed (a speed limit ending in a 5, e.g. 45, displayed in a yellow sign, e.g. the one pictured).
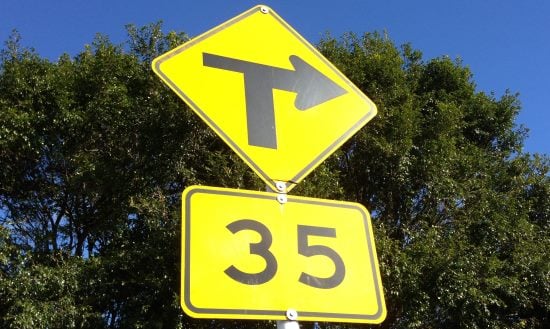
35kph right turn

Driver actions

  • Scan well ahead, to the sides and in your mirrors to identify potential hazards, warning signs and advisory signs
  • Position your car correctly before the curve. For a left-hand curve this will be just to the left of the centre line, unless there’s another vehicle coming and you give up some of your position for safety. For a right hand curve it will be in the left of the lane. Both of these positions improve your view through the corner.
  • Adjust your speed for the curve and weather/road conditions
  • Keep your car within the marked lane and a safe distance from kerbside hazards and oncoming vehicles
  • Maintain an appropriate speed throughout the curve
  • Maintain your position in the traffic flow, leaving at least two seconds to the vehicle in front
  • Look well ahead in the curve, checking for potential hazards
  • When leaving the curve check your mirrors and accelerate back to an appropriate speed

Perform the tasks at least twice.

Previous (22) | Next (24)

  • DisqusDisqus
Recent Resources
  • Using SAMPLE to gather patient information for a first aid assessment
  • The recovery position: when and how to use it
  • Isolation and lockout/tagout explained
  • How to check responsiveness using the AVPU scale in first aid
  • Scene safety and the DRSABCD action plan
  • Auditing permits for high-risk work
  • What actually happens when you call 111 about a road rage incident
  • First aid kits and workplace readiness
  • Managing concurrent and conflicting works
  • How does music affect your driving?

Licences and Courses

  • Car
  • Motorbike
  • Heavy Vehicles
Car
  • Core
  • Behaviour
  • Parking
  • Emergencies
  • Road position
  • Intersection
  • Theory
  • Signs
Motorbike
  • Bike-specific questions
  • Core
  • Behaviour
  • Parking
  • Emergencies
  • Road position
  • Intersection
  • Theory
  • Signs
Heavy Vehicles
  • Class 2
  • Class 3-5
  • Core
  • Behaviour
  • Parking
  • Emergencies
  • Road position
  • Intersection
  • Theory
  • Signs

Vehicle and workplace training

  • About
  • Resources
DT Driver Training TR Group
About
  • About us
  • Contact us
  • Privacy Policy
  • Terms and Conditions
Resources
  • Homepage
  • Driving Tests Android App
  • Driving Tests iPhone App
  • Getting your learner licence
DT Driver Training TR Group
Copyright 2010-2026 DT Driver Training Ltd, PO Box 12541, Penrose, Auckland, 1642. All rights reserved. Questions and images are used with permission from NZTA; question answers are proprietary.